How to Deploy Laravel to Digital Ocean
Posted 5 years ago by Ryan Dhungel
Category: Deployment Server Digital Ocean Laravel Github Git PHP
Viewed 23112 times
Estimated read time: 9 seconds
In this tutorial, I will guide you step by step on How to Deploy Laravel to Digital Ocean so that you can push your local laravel project to the cloud. We will be using Digital Ocean as our clound hosting provider. Digital Ocean is the best choice in my opinion because its cheap, extremly fast, and it lets you have minimum of 10 droplets(server environments). You can configure them to your need such as for PHP, Ruby, Node or Python apps.
This tutorial is 100% practical. I will cover all the stpes from pushing your project to github/bitbucket. So that you can make commits into your project in local computer, push them to github/bitbucket and pull those changes is digital ocean servers. I will also cover generating and pairing ssh keys and everything else. So lets begin.
Sign up to Digital Ocean
- First you need to signup to Digital Ocean
- Use the link below to signup
- Sign up to Digital Ocean with Special Credit Offer between $10 - $100
- And navigate to signup page by clicking the Signup menu on top right side of the Digital Ocean website
- If you use the above link you will get. between $10 to $100 credit applied in your account on signup straight away
- Once your account is ready, you can create a new droplet
- In your digital ocean account, on top you will see a button to create a new droplet
- From the options choose ubuntu
- And choose $5 monthly package or bigger one if you want bigger - You can always change it later
- Choose datacenter - New York or any other city your site visitors will be
- Then go all the way down, update the hostname that looks something like this - ubuntu-s-1vcpu-1gb-nyc1-01
- To your liking. I am calling it codecontinue. Feel free to name yours differently.
- Hit create button
- Now check your email, you will receive an email about your new droplet
- This Email contains important info such as IP address, login credentials etc
- You will be able to access your site using the IP address (
http://204.48.20.189) in the browser just like you would access a site usingdomain.com - It's great because your site is live and you can add a domain name anytime later using Digital Ocean dashboard. Nice and easy!
Accessing Digital Ocean Droplet as a root user
- Open your terminal and try to login
- Use
sshfollowed by theIPaddress you got in email from digital ocean - Do the following:
ssh [email protected]- It will ask you - Are you sure you want to continue connecting (yes/no)?
- Type yes and hit enter
- Type password - the one you got in your email, you can copy paste
- Then again it will ask you for current password - (current) UNIX password:
- Paste the same password one more time
- Now it asks you to enter new password
- So type new password and make sure to remember it
- Once done hit enter. it will ask you to retype once more
- Once done, you will be logged into your droplet like so:
root@codecontinue:~#- To exit type exit and hit enter
- To login again
ssh [email protected]- Use password and then you will be logged in
Generate SSH key for Enhanced Security
- Use ssh key to login and also change root user for enhanced security
- Make sure you are logged in from the terminal
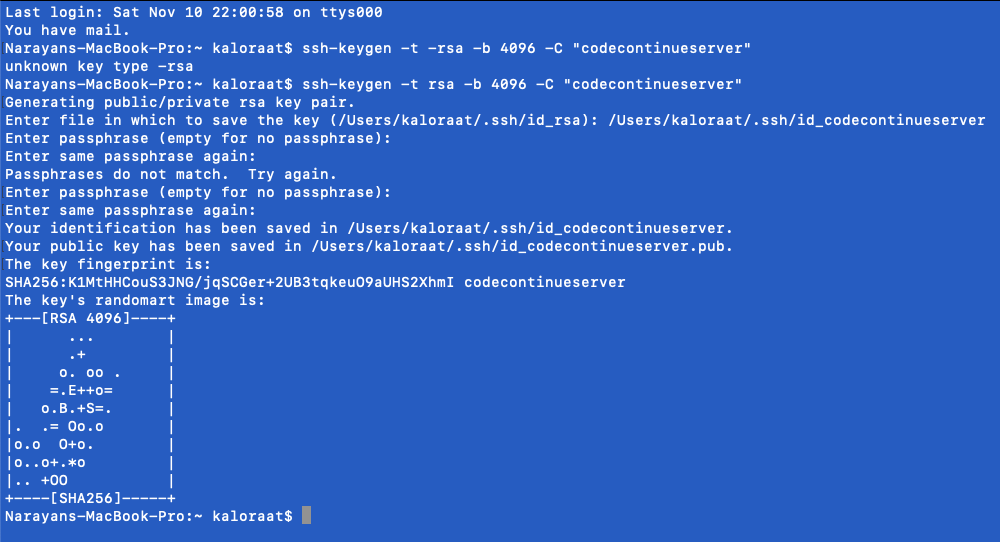
- Open new terminal tab and type - I am using codecontinueserver. Feel free to name is different.
ssh-keygen -t rsa -b 4096 -C "codecontinueserver"- Then it will show you this:
Generating public/private rsa key pair.Enter file in which to save the key (/Users/kaloraat/.ssh/id_rsa):- Copy that link and append the name that you gave to your ssh keygen like so:
/Users/kaloraat/.ssh/id_codecontinueserver- Then it will ask you for this:
Enter passphrase (empty for no passphrase): - Its not necessary because we will be using the ssh key to login and it will be accessible only from your computer, so just hit enter a few times
- Ok lets check out our ssh key
- Its in the root directory in a hidden folder called .ssh
- Run the following command in terminal
cd ~/.sshls your new ssh key will be there- There you will see two versions of the key
id_codecontinueserverandid_codecontinueserver.pub- The one with
.pubextension is for public services such as github or bitbucket - We will host our codebase on service like github or bitbucket
- It will be pulled in by our server on digital ocean
- While doing that, it will match with private key and the public version to allow access
- Copy the public ssh key in the clipboard like so
cat id_codecontinueserver.pub | pbcopy - Now leave this terminal window open, we will come back to it later
Add a new user to replace root user
- Head back to the terminal window where you are logged in to digital ocean
- It is recommended by Digital ocean(and its good for enhaned security too) to restrict root user so lets create a new user to replace root user
- Run the following command
adduser codecontinue- It will ask:
Enter new UNIX password: - Type password hit enter... do the same with repeat password.
- Make sure you remember the password
- You can just hit enter and not worry about filling full name, number etc
- It will ask - Is the information correct? [Y/n]
- Type
y - Now login as super user
- Run the following code
sudo su codecontinue - Now its not root, its you - codecontinue. awesome!
Provide sudo privilege to new user
- But codecontinue does not have sudo privilege yet.
- So lets exit first
- Then run
exit - Tthen set this codecontinue user as admin
usermod -aG admin codecontinue - Now try running
sudo su codecontinuecdsudo su root - Type the password and hit enter
sudo su codecontinuell - There you dont see .ssh foler so lets create a directory for ssh
mkdir .sshcd .sshvim authorized_keys - And here also we need to paste the ssh key, the public one with
.pubextension - So go to the other terminal still open and run this command to copy the public key
cat id_codecontinueserver.pub | pbcopy - Come back to digital ocean terminal window and paste or use shortcut
command v - Watch out for the beginning words of the key you paste
- Sometimes the begining letters
sshis onlysh- missing very first 's' letter - In that case make sure to use arrows to reach at the beginning of the line and add s
- It should begin like so:
ssh-rsa XXXXXX Then to get out of the edit mode pressESCkey in your keyboard. And then type:wqand hitenterEnter key- Now run exit multiple times to come out of the digital ocean, back to the root of your computer
- Now login with the key using the codecontinue user
ssh -i ~/.ssh/id_codecontinueserver [email protected] - Awesome! we are logged in as codecontinue
Remove root user's login rights
- But root user still has access to login, lets remove that
sudo vim /etc/ssh/sshd_config - Type password
- Scroll down until you see this line:
PermitRootLogin yes - Change this to no - to be able to edit this file press
ithen make changePermitRootLogin no - Then scroll all the way to the bottom and find this line
PasswordAuthentication yes - Change to this no
PasswordAuthentication no - Then to get out of the edit mode press
ESCkey in your keyboard. And then type:wqand hitenterEnter key - After making any change we need to restart the server to see the changes applied
sudo service ssh restart - Now to exit run
exit - Now we are back on our mac
- Lets try login as root to see if it works - run
ssh [email protected] - You will get an error:
[email protected]: Permission denied (publickey). - Means all our hard work paid off.
lets try login with codecontinue using sshssh -i ~/.ssh/id_codecontinueserver [email protected] - We are logged in
- Now this is the only way to login. awesome!
Installing PHP Nginx MySql and Git on server
- Now its time to install php nginx mysql git on server
- Make sure you are logged in to the server using ssh and codecontinue user
ssh -i ~/.ssh/id_codecontinueserver [email protected]sudo apt update - Check which php version we have
sudo apt-cache search php - At the time of writting this tutorial it shows this at the very end
php7.0-dba - DBA module for PHP - Currently we should be using php7.3 so lets upgrade
- First we need to install a repository
sudo add-apt-repository ppa:ondrej/phpsudo apt-get update - Now if you run
sudo apt-cache search php - You get php7.3 along with mysql ane all other stuffs related to php - see at the very end, awesome!
- Lets also install mysql server
sudo apt-get install mysql-server - You will get warning - Do you want to continue? [Y/n]
- Type
yand hit enter - Mysql server configuration window will open. It asks for password so create one and hit enter
- It will continue the downloading once complete. you can try
mysql -u root -pfollowed by the password you just created - Now you can run sql commands such as this to show databases
SHOW DATABASES; - Lets exit
exit - Also install nginx
sudo apt-get install nginx - Press y hit enter
- To see whats installed run
ll - If you scroll up, there you see nginx among a lot of other stuff
- Also lets install git
sudo apt-get install git - check
git --version - you see - git version
2.7.4 - Also install
zipandunzipwhich is required by composer later
Connect Github or BitBucket Repository to Digital Ocean Server
- Its time to connect your github or bitbucket repository to this server
- I will use bitbucket because there you can host private repository for free
- Whereas in github, you get to host only public repository for free
- The process however will be exactly same, I will be covering both
- In your terminal where you are inside the digital ocean server run the create keygen
- Use the line below - change to github if you will be using github
ssh-keygen -t rsa -b 4096 -C "bitbucket" - Then you will get this:
Enter file in which to save the key (/home/codecontinue/.ssh/id_rsa): - This path is in server, so we dont need to make any changes
- Just hit enter multiple times then run
cat ~/.ssh/id_rsa.pub - Copy the long key you see in terminal
- Open bitbucket or github webpage
- Create a new repository - give it a name and hit create
- There you get the repository link. lets just wait. keep the window open.
- Head over to your existing laravel project or create a new one whatever you prefer
- Get inside the project in a new terminal window using
cd codecontinue(codecontinue is my laravel project name here) and rungit initgit add .git commit -m "deployment" - Now run the command below followed by the url (remove git clone part if its there)
- You actually see the url on the github or bitbucket page while you created a new repository
git remote add origin https://[email protected]/kaloraat/codecontinue.gitgit push -u origin master - Ok our project is now pushed in bitbucket or github
- Now we need to add ssh key to our project in bitbucket or github
- First copy the key that we still have in terminal where we are logged into the server
- Then either in bitbucket or github - go to settings
- In github, its in Settings > Deploy Keys > Add deploy key (on top right corner)
- Then give it any title and paste the key in the key field
- Click Add key and you are done (No need to click Allow write access)
- In bitbucket its in setttins > Access keys (left sidebar)
- Click on Add key
- Give it a name and paste the key in the key box hit save
- Now lets test the connection
- Back in terminal where we are in server
- Run the code below - if using github replace bitbucket with github
ssh -T [email protected] - It will say
The authenticity of host 'bitbucket.com (18.205.93.4)' can't be established.Are you sure you want to continue connecting (yes/no)? - Type
yesand hit enter - Now you see the following:
This deploy key has read access to the following repositories: - It means we are doing good!
Clone Project Repository from Github or Bitbucket
- Now we can clone this repo to our server
- Clone into html folder (add html at the end)
git clone https://[email protected]/kaloraat/codecontinue.git html - Type password if asked - it will be either github or bitbucket password
- Lets get inside the project
cd htmlll - Here you see all the files and folders of your project
- Install composer from within this html folder
sudo apt install composer - Try running composer command - we have it installed now
composer - To meet the composer install requirements and to avoid some issues(bugs) with php7.3 lets install them again downgrading to php7.2
- Frst we need to remove php7.3
- Run this command
sudo apt-get purge php7. - Then run
sudo apt-get install php7.2-cli php7.2-fpm php7.2-mbstring php7.2-mysql php7.1-mcrypt php7.2-curlsudo apt install composersudo apt-get update - Then run
composer install --no-dev - Awesome. all the packages required to our laravel project are installed
- Try running
ll - There you see
.env.example - Lets change that to
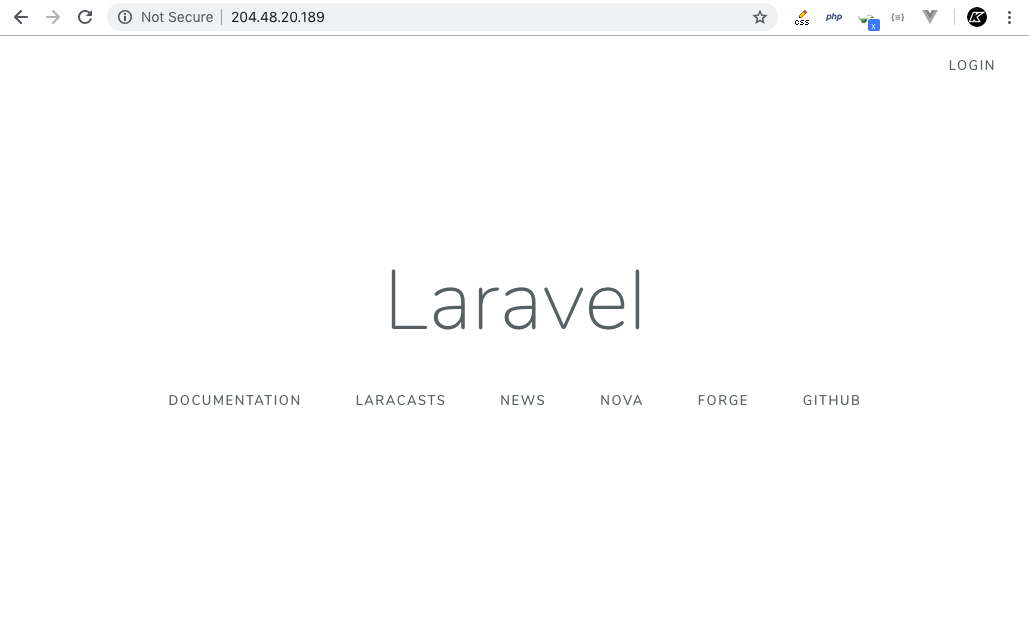
.envcp .env.example .envphp artisan key:generate - Now try accessing the app using the IP address
- Paste in the url of your browser
204.48.20.189 - There you will get:
- Welcome to nginx!
- That means we need to configure nginx next
Nginx Configuration
- Time for nginx configuration
- Back to server inside html folder, thats where we left earlier
- Go back to root
cdcd /etc/nginxll - There you will see -
sites-available/sudo vim sites-available - There you see
default - Which means we need to get inside default
- To exit run:
:qsudo vim sites-available/default - Now we are in the nginx configuration
- There you see -
root /var/www/html; - To make changes first press
i - Then change that by adding public at the end like so:
root /var/www/html/public; - Then scroll down... and find this line:
index index.html index.htm index.nginx-debian.html; - Change to the following:
index index.html index.htm index.php; - Then chang this:
try_files $uri $uri/ =404; - To this:
try_files $uri $uri/ /index.php$is_args$args; - Then uncomment and make change from php7.0 to php7.2
- Here is the complet code
#means commented out - uncomment the other lines as shown below
location ~ \.php$ {
include snippets/fastcgi-php.conf;
#
# # With php7.0-cgi alone:
# fastcgi_pass 127.0.0.1:9000;
# # With php7.0-fpm:
fastcgi_pass unix:/run/php/php7.2-fpm.sock;
}
- To write and quite
- Then to get out of the edit mode press ESC key in your keyboard. And then type :wq and hit enter Enter key
- Then
cd /var/wwwllcd htmlll - There we dont have our project
- Instead our project is in the root directory's
htmlfoldercdllcd htmlll - We should move this from root to /var/www/html
cd - First lets remove the empty
htmlfoldercd /var/wwwsudo rm -rf htmlcdsudo mv html /var/www/cd /var/wwwllcd html - Here you see all the files/folders of laravel project
cdsudo service nginx restart - Ceck if nginx is working properly
sudo nginx -t
Allow permision to read and write to certain folders
cd /var/www/html
sudo chmod -R 777 storage
- Now go to browser and access your project
http://204.48.20.189/ - When you make any change to your project, you push to your github
- Then to pull that change here in digital ocean server (inside
htmlfolder where our laravel project is) like so:git pull from within /var/www/html
MySql Database connection
- In your server run
mysql -u root -pSHOW DATABASES; - Create a new database
CREATE DATABASE codecontinue; - Then to exit run
exitcd /var/www/html - update .env
vim .env - Press
i - Change database name
DB_DATABASE=codecontinue DB_USERNAME=root DB_PASSWORD=whatever
Running php artisan commands
- Now you can run Laravel php artisan commands as well like form within
/var/www/htmlphp artisan migrate
Access live server database to local computer
- I am using sequel pro for mac
- Quit if sequel pro is already open. Then start sequel pro
- Click on ssh tab
- Give name -
codecontinue
mySql host = 204.48.20.189 username: root password: whatever database: codecontinue port: 3306 ssh host: 204.48.20.189 ssh user: codecontinue ssh key: click on key icon locate the key inside .ssh hidden folder - id_codecontinueserver ssh port: 22
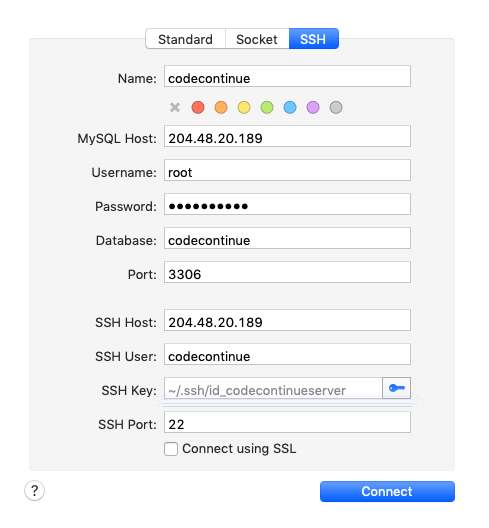
Click connect and you are done. Now you can access live server database in your local computer. Thats great!
Thanks for reading this. I hope you made it. If you come across any issues, leave your comments below. Cheers!