Node JS API Authentication using JWT
Introduction
This tutorial will teach you how to build Token based Authentication system with Node JS, Express JS and Mongo DB. There will be 3 routes for Signup, Signin and Secret page. Only a user who signup or signin to the application, will get access to secret page.
We will use postman to test our API. You can use your own frontend framework like React, Angular or Vue to build the frontend and use this API as backend.
Prerequisite
- Basic understanding of JavaScript
- Basic understanding of Node JS
- Basic understanding of HTTP and API
- Be able to use postman
Lessons 13
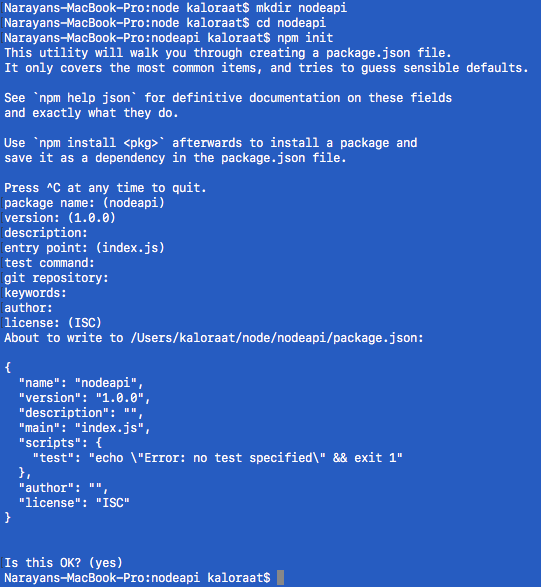
Lets begin by creating a fresh node js project.
// make a directory
mkdir nodeapi
// get inside the project
cd nodeapi
// initialize with npm
npm init
// hit enter multiple times to accept all the default options
In this section, you will learn about modules in node js.
- Modules are basically a block of code. It can be a function, variable, object etc.
- NPM packages like express, mongoose can be installed and use in your node project. They are third party modules.
- You can use
require()to use these modules - You can create your own modules too and use them throught your application.
// create a new file called test.js inside your project folder
touch test.js

// in test.js write the following code
console.log(module)

// save the file then in the terminal run
node test.js

// in the terminal you see the following
  Module {
  id: '.',
  exports: {},
  parent: null,
  filename: '/Users/kaloraat/node/nuxtapi/app.js',
  loaded: false,
  children: [],
  paths:
   [ '/Users/kaloraat/node/nuxtapi/node_modules',
     '/Users/kaloraat/node/node_modules',
     '/Users/kaloraat/node_modules',
     '/Users/node_modules',
     '/node_modules' ] }
As you can see, the module object has exports property which is an empty object. Which means you can add your own functions, varialbes to this empty exports : {} object. Whatever you add to this exports object will be available throughout your node project. Because it is a part of the node process.
It's like a global object where you have access to all the properties and methods of node js.
To better understand process. Try console log(process) in test.js and see the output in the terminal. It contains huge number of properties along with module export which we just saw.
// test.js
console.log(process)

// then run in terminal
node test.js
Lets move from console logs and create a function called sum inside test.js and export it using module.exports so that it is usable in other parts of our application.
module.exports.sum = function(a, b) {
	return a + b;
};
Lets use this sum() in another file called app.js
// terminal
touch app.js
// app.js
const test = require("./test.js");

console.log("This is sum function's output: ", test.sum(100, 20));
// terminal
node app.js

// output
This is sum function's output:  120
This is how you can export a function from one file to be used in another file. This is the basics of modules in node js. Lets move on to actually build an app using node express and mongodb.
Lets start building API using node express and mongodb along with necessary packaged. We will be adding more packages as we progress.
// terminal - inside nodeapi project
npm install express morgan body-parser mongodb mongoose
// app.js
// require express module to build express app
const express = require("express");
// to see friendly notifications in the terminal such as GET '/signup'
const morgan = require("morgan");
// to extract body info form HTTP headers
const bodyParser = require("body-parser");

// execute express as a function
const app = express();

// middlewares
app.use(morgan(`dev`)); // use 'dev' format in console logs in terminal
app.use(bodyParser.json()); // parse json

// start the server on the given port
const port = process.env.PORT || 3000;
app.listen(port);
// use backtics `` not comma ''
console.log(`Server is listening on ${port}`);
Now try running this app in the terminal.
// terminal
node app.js

// output
Server is listening on 3000
To stop the server press control+C or command+C
You might not like starting node server manually each time using node app.js
The solution to this is using a npm package called nodemon. Lets install it globally.
// terminal
npm install -g nodemon
Then in your node app, you must have noticed package.json file. This file keeps track of all the packages you have installed. You can also write a script to run the node server using nodemon.
Modify the existing script to the following.
// package.json
"scripts": {
    "start": "nodemon app.js"
  },
now in the terminal you can run this command
npm start
This will run your node app and keep track of the changes automatically. To stop you can always press control+C or command+C
Instead of writing all the code inside app.js, we will be adopting MVC (model, view, controller) pattern. But obviously there will be no views folder because we are building API. Lets begin by creating two folders inside the nodeapi project folder.
mkdir routes
mkdir controllers
Create users.js file inside controllers folder
// controllers/users.js

module.exports = {
	// req - contains incoming http request information
	// res - has methods available to respond to the incoming requests
	// next - proceed to the next stage
	signup: async (req, res, next) => {
		res.json("signup called");
	},

	signin: async (req, res, next) => {
		res.json("signin called");
	},

	secret: async (req, res, next) => {
		res.json("secret called");
	}
};
Create users.js file inside routes folder
const express = require("express");
// user express router
const router = express.Router();

const UsersController = require("../controllers/users");

router.route("/signup").post(UsersController.signup);
router.route("/signup").post(UsersController.signin);
router.route("/secret").get(UsersController.secret);

module.exports = router;
Now lets use the routes in app.js
app.use(bodyParser.json()); // parse json

// use routes
app.use("/", require("./routes/users"));
Now we can test these routes we have created. for this lets use postman. If you dont have it yet, please install first.
First make sure you have node server running.
// terminal
npm start
Then open postman and make post request to http://localhost:3000/signup
The fields with green circle are required. Use dropdown and buttons to adjust the settings in postman. Here is the screenshot.
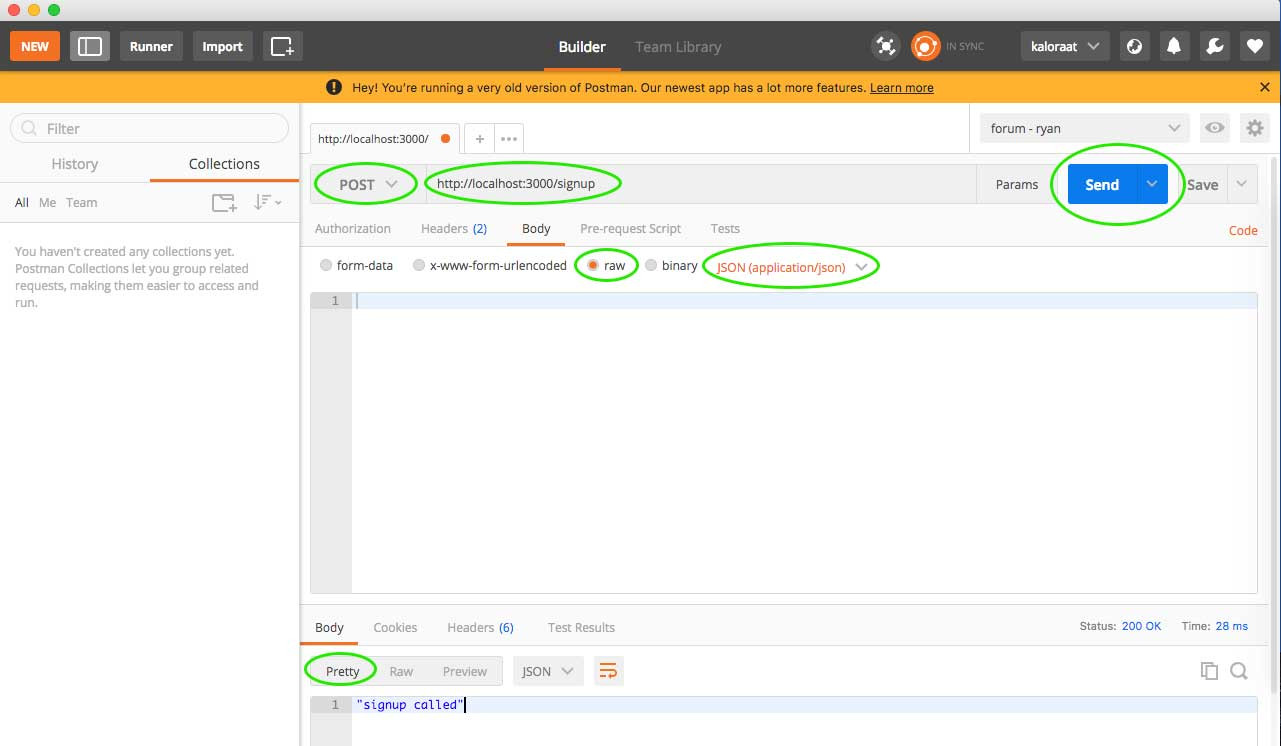
you get the following response.
"signup called"It means we are doing good. Lets move on to validation. After validation we will be able to send user data like email and password to create a new user and save in the dabase.
Before saving user data(on user signup) to database, we obviously need to validate the data. We can use a package called Joi for validation which a part of a Hapi JS, a node js framework.
First lets install joi from npm.
// terminal
npm install joi
Then create a folder called helpers and inside, create a file called routeHelpers.js
// helpers/routeHelpers.js
const Joi = require("joi");

module.exports = {
	// using arrow function
	validateBody: schema => {
		return (req, res, next) => {
			// validate the incoming req.body using Joi.Validate()
			// passing arguments - req.body and schema(see below)
			const result = Joi.validate(req.body, schema);

			// on error
			if (result.error) {
				// respon with 400 status code and error in json format
				return res.status(400).json(result.error);
			}

			// attach value property to res object
			// our goal is to use validated data(res.value.body) instead of direct (res.body)
			if (!req.value) {
				req.value = {};
			}

			req.value["body"] = result.value;
			next();
		};
	},

	// define schemas object
	schemas: {
		authSchema: Joi.object().keys({
			email: Joi.string()
				.email()
				.required(),
			password: Joi.string().required()
		})
	}
};
Now we can use this validation inside routes/users.js
// routes/users.js
// full code
const express = require("express");
// user express router
const router = express.Router();
// for validation - use object destructuring to bring in only the needed properties
const { validateBody, schemas } = require("../helpers/routeHelpers");

const UsersController = require("../controllers/users");

router
	.route("/signup")
	.post(validateBody(schemas.authSchema), UsersController.signup);
router.route("/signup").post(UsersController.signin);
router.route("/secret").get(UsersController.secret);

module.exports = router;
Is your server still running? If not first start the server using npm start
Now try using postman to make post request to http://localhost:3000/signup with following data as body. Make sure the Headers > Content-Type is selected as application/json
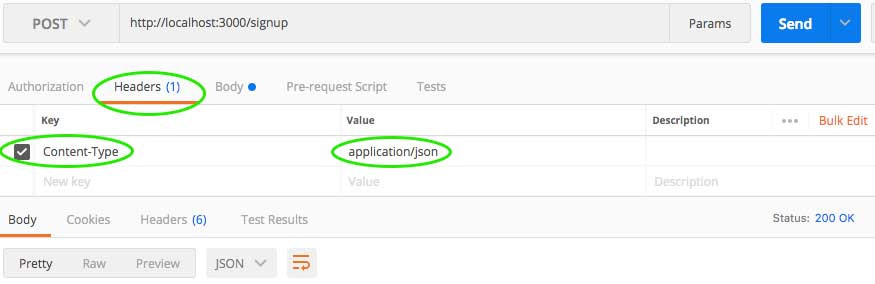
Then write the following data in body section in json format and send with the request.
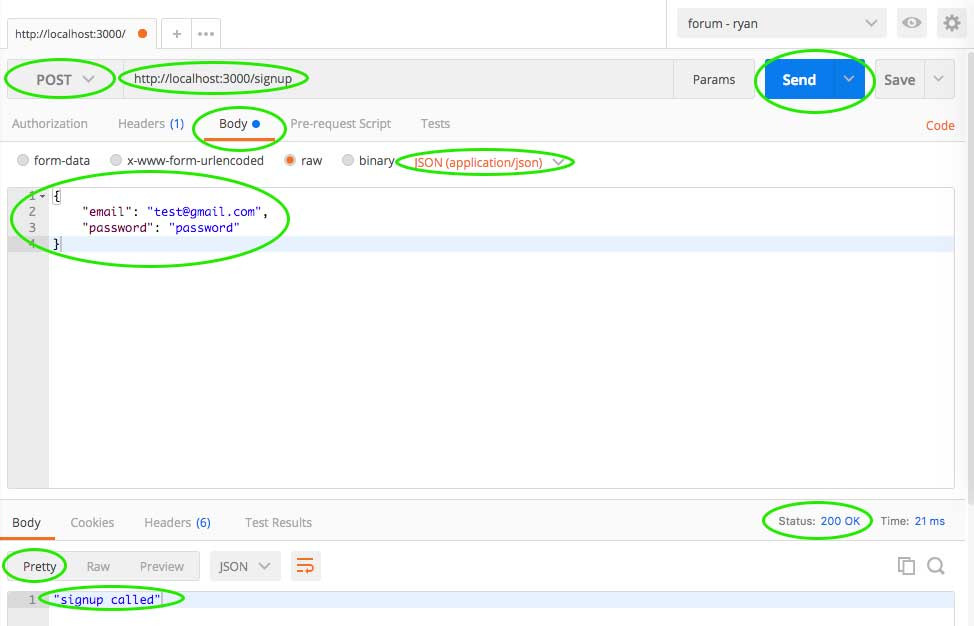
You will see the json response of "signup called"
The next step is to use mongo database so that we can save the user info and ulitmately create or signup a new user.
We can use mongo db to save data. We can also use a package called mongoose to easily query the mongo db. There is also a software available called Robo mongo or Robo 3T which is a GUI for mongo db. Using robo mongo you can visually see the mongo database.
If all this is new to you then you can also use online mongodb service called mlab.
We have already installed mongoose, if you haven't installed it yet. Please install.
npm install mongoose
Require mongoose in app.js
const express = require("express");
// mongoose
const mongoose = require("mongoose");
// nodeapi will be the name of the database
// if it doesnt exist, will be created automatically
// if you are using mlab, pass the url
mongoose.connect("mongodb://localhost/nodeapi");
Then create a models folder in the root of your node project. Then inside models folder, create user.js file. Models will act like a middleman for communicating with database.
mkdir models
// models/user.js
const mongoose = require("mongoose");
const Schema = mongoose.Schema;

// create a schema
// define the type
const userSchema = new Schema({
	email: {
		type: String,
		required: true,
		unique: true,
		lowercase: true
	},
	password: {
		type: String,
		required: true
	}
});

// create a model - make the model name singular / mongoose will make it plural
const User = mongoose.model("user", userSchema);

// export the model
module.exports = User;
In controllers/user.js first require the user from models/user so that we can create a new user. Mongoose will be in instant communication with given database. In our case we have mongoose.connect("mongodb://localhost/nodeapi"); in the app.js
// controllers/user.js
// full code

// require user model
const User = require("../models/user");

module.exports = {
	signup: async (req, res, next) => {
		// use req.value.body not req.body
		// this will give use validated body of the request
		const { email, password } = req.value.body;
		// check if user exists
		// use await keyword because it takes time solve this query from database
		const foundUser = await User.findOne({ email });
		if (foundUser) {
			// respond with 403 forbidden status code
			return res.status(403).json({ error: "Email already in use" });
		}
		const newUser = new User({
			email,
			password
		});
		// await for a new user to be saved because it takes some time
		await newUser.save();

		// once user is saved, respond with json
		res.json({
			user: "created"
		});
	},

	signin: async (req, res, next) => {
		res.json("signin called");
	},

	secret: async (req, res, next) => {
		res.json("secret called");
	}
};
Now you can try using postman. You can make post request to http://localhost:3000/signup just like you did earlier with Headers > Content-Type > application/json
And email and password as body.
It should successfully save the new user to database. This time instead of getting the response of "signup called" like earlier, you should see the following:
{
    "user": "created"
}
That's because we responded with user created json response in controllers/user.js on signup. If you send the same email and password info twice, you will see the following response:
{
    "error": "Email already in use"
}
That means, our validation is working.
Since we are building an API, we need a way to respond to the frontend with a secure token which can be used to identify the user and allow access. For this we will be using json web token.
With our existing code, you will see the following deprecation warning in the console:
Server is listening on 3000
(node:6394) DeprecationWarning: current URL string parser is deprecated, and will be removed in a future version. To use the new parser, pass option { useNewUrlParser: true } to MongoClient.connect.
(node:6394) DeprecationWarning: collection.ensureIndex is deprecated. Use createIndexes instead.
POST /signup 403 29.781 ms - 32
To get rid of this error, you can make the following adjustments in your app.js
const mongoose = require("mongoose");
// for console error about deprected issues
mongoose.set("useCreateIndex", true);
mongoose.connect(
	"mongodb://localhost/nuxtapi",
	{ useNewUrlParser: true }
);
Lets move on to responding with json web token on user signup.
Lets generate json web token and respond with token on user signup. First we need to install npm package jsonwebtoken. To learn more about jsonwebtoken visit their github page.
In controllers/user.js, we want to send token as a json response, once the user is saved.
Steps:
- require
jsonwebtoken - create a
signTokenmethod to genereate a token, passing user as argument. - use this
signTokenright after saving the user in signup method - send token as json response
npm install jsonwebtoken
// controllers/user.js
// full code
// require user model
const User = require("../models/user");
// require json web token
const JWT = require("jsonwebtoken");

// create a signToken method to genereate a token, passing user as argument.
signToken = user => {
	return JWT.sign(
		{
			iss: "NodeAPI", // issuer
			sub: user.id, // sub means subject which is mandatory
			iat: new Date().getTime() // issued at date
		},
		"jkahfdskjhfalkdslads" // random secret
	);
};

module.exports = {
	signup: async (req, res, next) => {
		const { email, password } = req.value.body;
		const foundUser = await User.findOne({ email });
		if (foundUser) {
			return res.status(403).json({ error: "Email already in use" });
		}
		const newUser = new User({
			email,
			password
		});

		await newUser.save();

		// use signToken method to generate token and respond on signup
		const token = signToken(newUser);
		res.status(200).json({ token });
	},

	signin: async (req, res, next) => {
		res.json("signin called");
	},

	secret: async (req, res, next) => {
		res.json("secret called");
	}
};
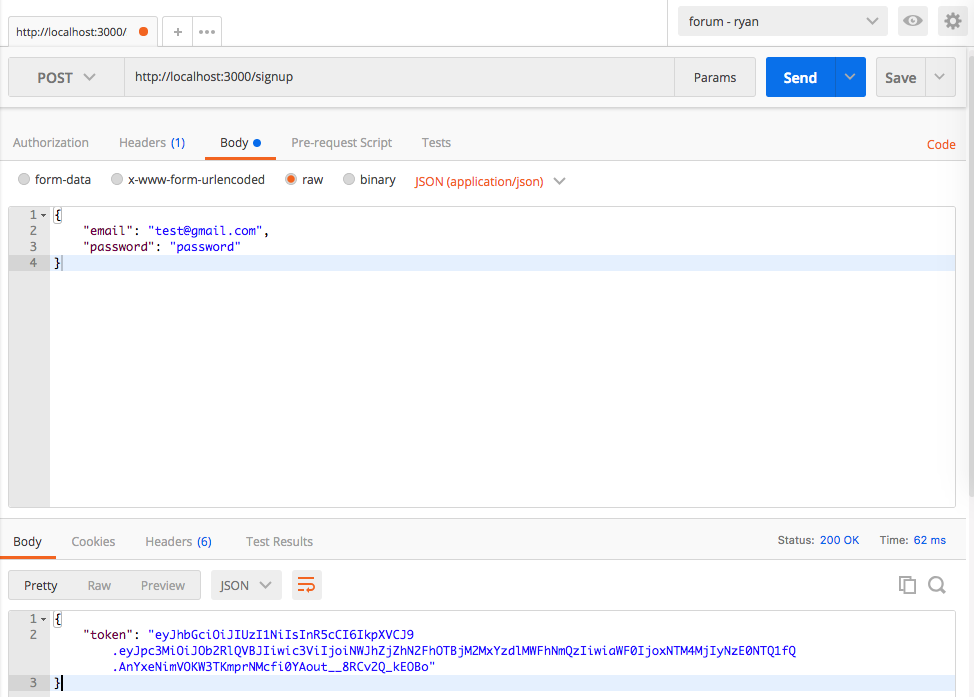
Now try making the same post request as earlier, this time instead of previously hard coded "created" text you get the following response. A token.
// make post request to
http://localhost:3000/signup

// json response in postman
{
    "token": "eyJhbGciOiJIUzI1NiIsInR5cCI6IkpXVCJ9.eyJpc3MiOiJOb2RlQVBJIiwic3ViIjoiNWJhZjZhN2FhOTBjM2MxYzdlMWFhNmQzIiwiaWF0IjoxNTM4MjIyNzE0NTQ1fQ.AnYxeNimVOKW3TKmprNMcfi0YAout__8RCv2Q_kEOBo"
}
Here is the screenshot:
Since frontend frameworks dont use sessions, this token will be used to authenticate the users and stored as cookies in localstorage to keep track of authenticated user. The next step is to signin user. We will be using passport.js for that.
But before we move to using passport, lets do a bit of refactor here. Lets extract the random string "jkahfdskjhfalkdslads" to a new location.
Create a folder called config and create index.js inside that folder.
// terminal
mkdir config
// config/index.js
module.exports = {
	JWT_SECRET: "jkahfdskjhfalkdslads"
};
Then we can use this secret key in controllers/user.js
// require secret
const { JWT_SECRET } = require("../config");

// create a signToken method to genereate a token, passing user as argument.
signToken = user => {
	return JWT.sign(
		{
			iss: "NodeAPI", // issuer
			sub: user.id, // sub means subject which is mandatory
			iat: new Date().getTime() // issued at date
		},
		JWT_SECRET
	);
};
Now lets move on to use passport.js.
So far we have been able to create a new user and respond with token. Now based on this token a user must be authenticated. A user with token should have access to "/secret" route. Any other user who has not signup or signin into our application should not get access to "/secret" route.
Lets begin by installing passport and passport-jwt (passport autnentication stragegy based on json web token) using npm.
// terminal
npm install passport passport-jwt
Then create a file called passport.js in the root of your project.
// terminal
touch passport.js
// passport.js
// full code
const passport = require("passport");
const JwtStrategy = require("passport-jwt").Strategy;
const { ExtractJwt } = require("passport-jwt");
const { JWT_SECRET } = require("./config");
const User = require("./models/user");

passport.use(
  new JwtStrategy(
    {
      jwtFromRequest: ExtractJwt.fromHeader("authorization"),
      secretOrKey: JWT_SECRET
    },
    // payload represents whatever is in const token = JWT.sign(...) see controllers/user > signToken()
    // payload.sub means JWT.sign({sub: newUser.id})
    async (payload, done) => {
      try {
        // find the user specified in token
        const user = await User.findById(payload.sub);
        // if user doesnt exist, handle it
        if (!user) {
          return done(null, false);
        }
        // otherwise return the user
        done(null, user);
      } catch (error) {
        done(error, false);
      }
    }
  )
);
Then use passport in routes/users.js
// routes/user.js
const passport = require("passport");
const passportConf = require("../passport");
Then apply passport.authenticate() method to the route './secret'
router
  .route("/secret")
  .get(
    passport.authenticate("jwt", { session: false }),
    UsersController.secret
  );
Now in controller/user.js > secret method, make the following change so that we can see the response when we try accessing secret page.
// controllers/user.js

secret: async (req, res, next) => {
  console.log("I managed to get here!");
  res.json({ secret: "resource" });
}
Now its time to test if we get access to secret page. Go to postman and try making get request to http://localhost:3000/secret page.
You get the response of Unauthorized
To get access, first create a new user like you did earlier. A post request with Headers Content-Type of application/json and body with email and password. For testing, you can either delete the old user that is already saved in the database or change the email to create a new user.
Then you should get the token as a response, just like you did previously.
Now copy that token and add it to the Headers in postman. This time along with Content-Type, we will also need to send Authorization key with token as value. Here is the screenshot.
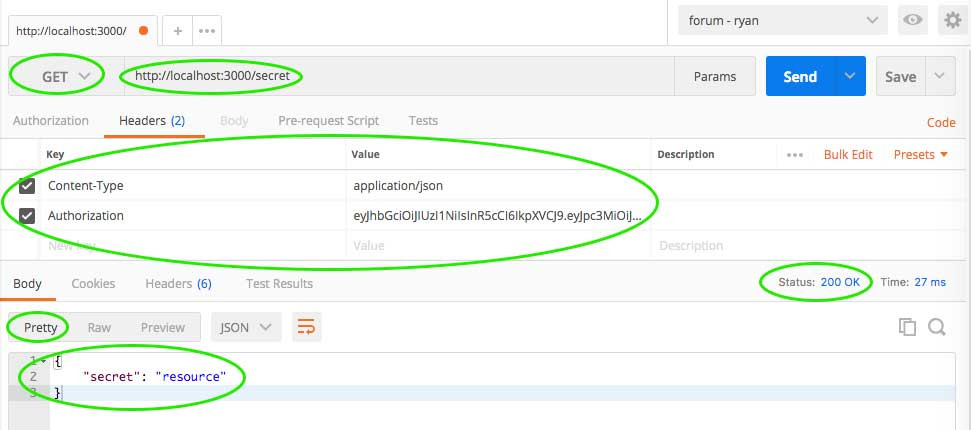
Watch this screenshot closly. The method has been changed from post to get and the url http://localhost:3000/secret is pointing to secret page. with this if you hit send button, you get access to the secret page.
But if you remove the token and try accessing the secret page, you get unauthorized.
This is great. We now can create and save a new user. Then respond with JWT which can be used to authorize user to protected routes. Next setp is implementing signin. We will use passport-local strategy to implement signin.
In the last section, we implement passport-jwt strategy. This time we will use passport-local stragety to authenticate user using username and password.
// terminal
npm install passport-local
In the existing passport.js file, add local stragegy.
// require
const LocalStrategy = require("passport-local").Strategy;
Then add local stragety. Put the following code at the end of the file.
// this code should be at the end of
// passport.js


// local stragegy
passport.use(
  new LocalStrategy(
    {
      usernameField: 'email',
    },
    async (email, password, done) => {
        // find the user specified in the given email
        const user = await User.findOne({email});
        // if user doesnt exist, handle it
        if (!user) {
          return done(null, false);
        }
        // check if password is correct

        // if not, handle it

        // otherwise return the user
    }
  )
);
As you can see, I have left last few lines with comment. We need has the password using bcrypt before saving to database which is a standard practice. Then we need to compare the saved password with the supplied password that we get on signin request.
Lets move on to models/user.js to implement hashing and compare. Then we will come back to passport.js local-strategy and finish up our API.
In the last section we were trying to implement passport local-strategy but we realized that we need to has and compare the password using bcrypt to implement signin method. Lets do it!
// terminal
npm install bcryptjs
Steps:
- Require bcrypt
- Use
premethod so that we can run certain piece of code before saving data to database - In this case we will hash the password and only then save to database
- Then use mongoose
schema.methods.isValidPasswordproperty to validate
Here is the full code of models/user.js
// models/user.js
const mongoose = require("mongoose");
// require bcrypt
const bcrypt = require("bcryptjs");
const Schema = mongoose.Schema;

// create a schema
// define the type
const userSchema = new Schema({
	email: {
		type: String,
		required: true,
		unique: true,
		lowercase: true
	},
	password: {
		type: String,
		required: true
	}
});

// using pre method we can run certain piece of code before saving to database
userSchema.pre("save", async function(next) {
	try {
		// generate a salt
		const salt = await bcrypt.genSalt(10);
		// generate a password hash (salt+hash)
		const passwordHash = await bcrypt.hash(this.password, salt);
		this.password = passwordHash;
		next();
	} catch (error) {
		next(error);
	}
});

// use mongoose schema.methods.isValidPassword property to validate
userSchema.methods.isValidPassword = async function(newPassword) {
	try {
		return await bcrypt.compare(newPassword, this.password);
	} catch (error) {
		throw new Error(error);
	}
};

const User = mongoose.model("user", userSchema);

module.exports = User;
Lets move back to the passport.js local-strategy to complete the signin feature.
Lets finish off the passport local-strategy to signin user.
Here is the full code of passport.js. Here we are using user.isValidPassword(password) method that we added to mongoose schema.methods in models/user.js passing password as argument.
// passport.js

const passport = require("passport");
const JwtStrategy = require("passport-jwt").Strategy;
const { ExtractJwt } = require("passport-jwt");

const LocalStrategy = require("passport-local").Strategy;

const { JWT_SECRET } = require("./config");
const User = require("./models/user");

// passport jwt strategy
passport.use(
  new JwtStrategy(
    {
      jwtFromRequest: ExtractJwt.fromHeader("authorization"),
      secretOrKey: JWT_SECRET
    },
    // payload represents whatever is in const token = JWT.sign(...) see controllers/user > signToken()
    // payload.sub means JWT.sign({sub: newUser.id})
    async (payload, done) => {
      try {
        // find the user specified in token
        const user = await User.findById(payload.sub);
        // if user doesnt exist, handle it
        if (!user) {
          return done(null, false);
        }
        // otherwise return the user
        done(null, user);
      } catch (error) {
        done(error, false);
      }
    }
  )
);

// local stragegy
passport.use(
  new LocalStrategy(
    {
      usernameField: "email"
    },
    async (email, password, done) => {
      try {
        // find the user specified in the given email
        const user = await User.findOne({ email });
        // if user doesnt exist, handle it
        if (!user) {
          return done(null, false);
        }
        // check if password is correct
        const isMatch = await user.isValidPassword(password);
        // if not, handle it
        if (!isMatch) {
          return done(null, false);
        }
        // otherwise return the user
        done(null, user);
      } catch (error) {
        done(error, false);
      }
    }
  )
);
We are almost done. Let's make some small change to signin method in controllers/user.js so that we can test our API.
We have already done a lot of work so far. Lets work on signin method now in controllers/user.js. Similar to signup method, we need to send token as response so that the user can be authenticated.
// controllers/user.js

signin: async (req, res, next) => {
		// respond with token
		const token = signToken(req.user);
		res.status(200).json({ token });
	},
Now you can passport.authenticate("local") method to authenticate the signin route.
// routes/user.js

// signin
router
	.route("/signin")
	.post(
		validateBody(schemas.authSchema),
		passport.authenticate("local", { session: false }),
		UsersController.signin
	);
Now just like you created a new user by making post request to signup route, you can make post request to signin route with the existing user email and password. If your email and password matches with the one that is saved in the database, you will be authenticated. Then with the returned token, you can get access to secret route.
Please delete or do not use the user that your created earlier to signin. Because then we did not have bcrypt implemented. But now we have hashed password implementation, old password wont work. So create a new user and try accessing signin route as well as secret route.
Everything should work perfectly.
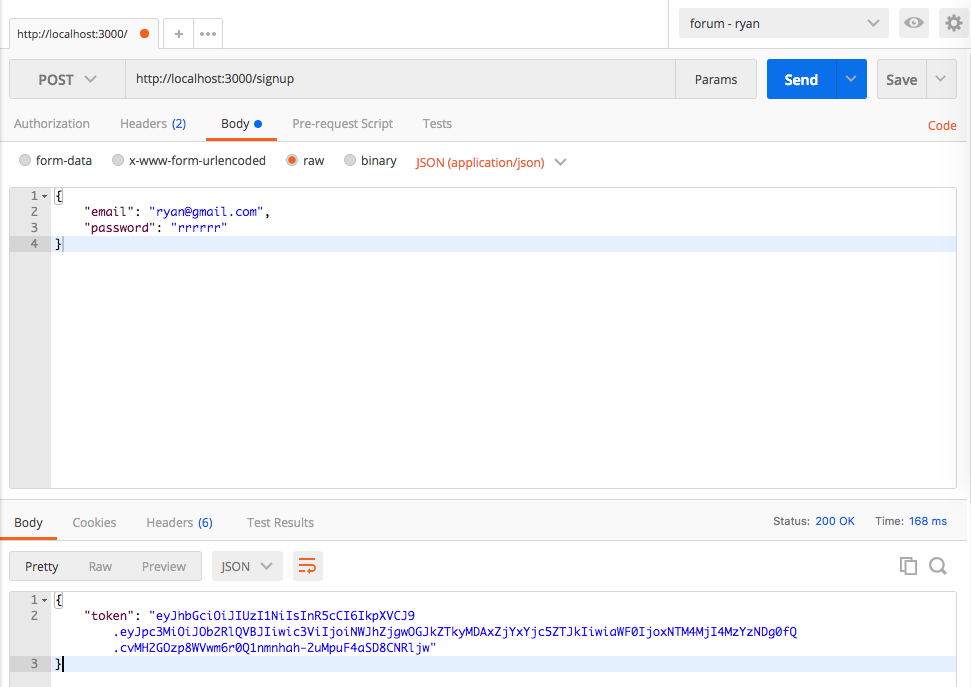
Here are the screenshots:
Create a new user with post request to signup. You get token as response.
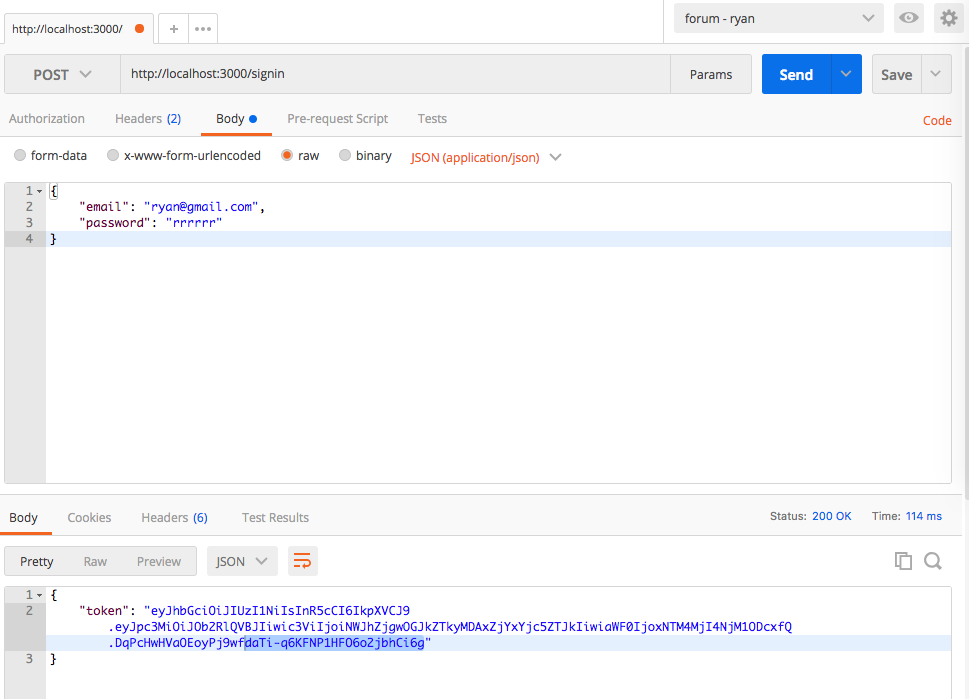
User signin with post request to signin. On sign also you get token as response.
Now copy the token and make a get request to protected route. In our case its secret page. Paste the token as value to Headers > authorization key.
Congratulations. You have build a Node JS API with Authentication. You can extend this API by adding CRUD features. You can also build a web app using frontend frameworks like Angular, React or Vue that uses this API.
For any help or suggestion, leave a comment below. Cheers!