Deploy Node Js App to Heroku Tutorial
Posted 4 years ago by Ryan Dhungel
Category: Web Development Heroku Deployment React
Viewed 7892 times
Estimated read time: 5 minutes
This tutorial shows you how to deploy your Node JS App/API to Heroku step by step. Building you app and running locally in your computer is fun but the real joy comes when it is running live in the cloud for the entire world to see right? No problem, Follow the steps below and you will have your Node App running live in Heroku cloud servers in no time.
For this tutorial you can use any Node Js app that you have build. I will be deploying the Node API which is part of a FullStack project with React frontend - A Local Business Site built using crete-react-app with Multiple Static Pages with SSR, Contact form with Multiple Image upload feature using Cloudinary and emailing that contact form straight to site owner using Sendgrid.
Actually the entire project is also available as a video course in Udemy. Feel free to check it out. But of course you can use any Node Js app/API for this tutorial.
For this tutorial you can use any Node Js app that you have build. I will be deploying a very simple API that I have build with Node. However the process is same wheather you have build and API or Full Web App. Lets begin.
Steps to deploy node js app to heroku
- Signup to heroku
- Login to heroku
After login you will be redirected to dashboard. On top right, click a button that says Create a new app
Give it a unique name, for example react-local-business-api - On your dashboard, you can see the app that you just created called react-local-business-api
- Click on the app name react-local-business-api
- On top you see menu bar, click on settings
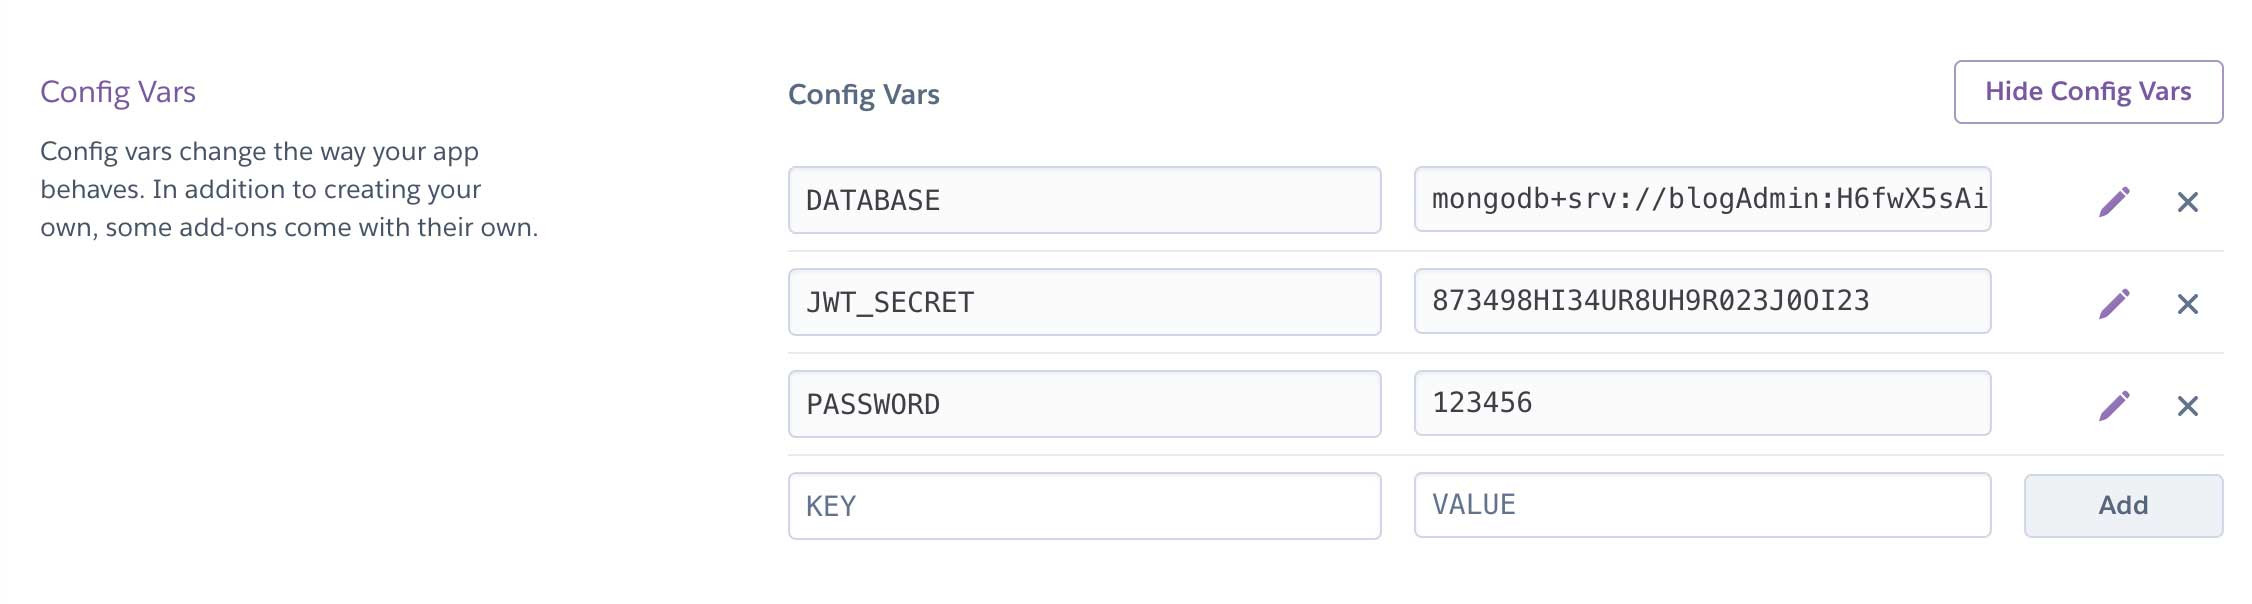
- There you see a button that says Reveal config vars
- There you will need to add your .env variables (in name > value pattern) one by one
- Install Heroku cli so that you can run heroku commands in your computer. It is available for both macOS and windows.
- Here is the official link to download heroku cli. https://devcenter.heroku.com/articles/heroku-cli
- For macOS users, you can also install this cli using homebrew.
brew tap heroku/brew && brew install heroku - Now its time to get back to your project in your local computer.Create a file named Procfile in the root directory of your project.
- Write the following code into your Procfile. Keep in mind that server.js filename depends on your project. You may have called it index.js or something else. It's the entry point of your server.
web: node server.js - Now open a terminal window or command prompt and get inside your project folder. Once inside the project folder run:
heroku login - If you are curious to see a list of apps you have in heroku, you can run this command to see all your heroku apps.
heroku apps - Ok now its time to initialize your project with git.
- IMPORTANT - Make sure you have
.gitignorefile in the root of your project with following code:
node_modules .env - Now run the the following commands one by one. Make sure to replace the app name with your app name that you created in heroku dashboard. We named it react-local-business-api
git init git add . git commit -m "first commmit" heroku git:remote -a react-local-business-api git push heroku master - Awesome. Your app is live now. You should see the live url in your terminal too somthing like so: https://react-local-business-api.herokuapp.com/api. You can copy paste that url in the browser or optionally run the following command to automatically open your app in the browser:
heroku open - If it was and API that you were deploying then you might need to access particular endpoint to see something in screen. In my case I had to visit
/api/posts - If you see the error on screen that says application error, Run this command in terminal to see the error logs. This will help you identify what is causing the error:
heroku ps:restart; heroku logs --tail - Now I can visit my API running live in the heroku cloud by visiting the following url: https://react-local-business-api.herokuapp.com/api
Congratulations on successfully deploying your Node Js APP to heroku. If you node app was using mongo atlas (manged mongo database as a service in the cloud) then you could add that Mongo Atlas URI to config vars in heroku dashboard and get your node app up and running that uses database too. Anyways I hope this tutorial was helpful Feel free to post any comments below.
About me
I am Ryan Dhungel. I am a fullstack web developer and online instructor. I am active on platforms like Udemy, Packt and O'Reilly. You can checkout my Fullstack courses that will help you reach a new height in the world of web development.
List of all my published courses in Udemy