Create A Dynamic XML Sitemap in Laravel
Posted 6 years ago by Ryan Dhungel
Category: Laravel
Viewed 33891 times
Estimated read time: 10 minutes
So you have build a great web application using laravel. Now you wan to create a Dynamic XML Sitemap for better SEO, which is great. Google says that Using a sitemap doesn't guarantee that all the items in our sitemap will be crawled and indexed, as Google processes rely on complex algorithms to schedule crawling. However, in most cases, our site will benefit from having a sitemap, and we will not be penalized for having one. So why not create a sitemap using the controllers, views and routes in our awesome laravel app and make Google, Bing and other search engine robots happy.
According to google, Here are some of the reasons why you should use sitemap:
- Your website is really large where google web crawlers might overlook crawling some of your recently updated pages.
- Your website has really large archive where pages are not well linked to each others.
- Your website is new and has few external links as a result Google might not discover your pages if no other sites link to them.
- Your site uses rich media content, is shown in Google News, or uses other sitemaps-compatible annotations.
You can read more about it in google webmaster support page.
What is sitemap made of?
It is basically made of individual <url> for each pages of your site. Inside each <loc> it points to a location of the file that it includes the <url> of. Also there are optional fields such as last modification date <lastmod>, change frequency <changefreq>, priority <priority>etc. You can read more about sitemap protocal in their official page.
Have a look at the example sitemap below:
<?xml version="1.0" encoding="UTF-8"?>

<urlset xmlns="http://www.sitemaps.org/schemas/sitemap/0.9">

   <url>

      <loc>http://www.example.com/</loc>

      <lastmod>2005-01-01</lastmod>

      <changefreq>monthly</changefreq>

      <priority>0.8</priority>

   </url>

</urlset>
The benefits of having more than one sitemap
Let's say we have database tables for Articles, Categories, Questions and Tags. We can create seperate xml sitemaps for each of them which will be easily managable and also be very clear to read for both humans and search engine robots. Then we will include all those 4 sitemaps into one index file and submit to google, bing or wherever we may please.
Getting Started
We will be creating 4 different sitemaps for 4 different database tables and include all of them in one main sitemap index. It is a requirment to have a main sitemap index if we are going to have multiple sitemaps. Each sitemap can hold around 50000 urls.
Creating the sitemap controller
Let's create a new controller for our sitemaps.
php artisan make:controller SitemapController
Creating the sitemap index
Now your newly created sitemap controller must look something like this:
<?php

namespace App\Http\Controllers;

use Illuminate\Http\Request;

use App\Http\Requests;

class SitemapController extends Controller
{
    //
}
Let's create a index method inside SitemapController class that will generate all the xml sitemaps we need. We will create 4 sitemapes for 4 of our database tables which are Articles, Categories, Questions and Tags. All of them will be included in one single sitemap index.
    public function index()
    {
      $articles = Article::all()->first();
      $categories = Category::all()->first();
      $questions = Question::all()->first();
      $tags = Tag::all()->first();

      return response()->view('sitemap.index', [
          'articles' => $articles,
          'categories' => $categories,
          'questions' => $questions,
          'tags' => $tags,
      ])->header('Content-Type', 'text/xml');
    }
Here we returned a response object to the view, and set the text/xml header to make sure the header is available to the view, we have includeed the response first.
Make sure you have called the models on top of your class like this:
use App\Article;
use App\Category;
use App\Question;
use App\Tag;
Creating the sitemap view
Go ahead and create sitemap folder in your laravel application resources/views/sitemap and create a file index.blade.php. We are going to wrap 4 of our <sitemap> inside <sitemapindex></sitemapindex> using <loc>. This is how our index page must look like:
Replace
project.app:8000with your website name such asmywebsite.com
<?php echo '<?xml version="1.0" encoding="UTF-8"?>'; ?>

<sitemapindex xmlns="http://www.sitemaps.org/schemas/sitemap/0.9">
    <sitemap>
        <loc>http://project.app:8000/sitemap.xml/articles</loc>
    </sitemap>
    <sitemap>
        <loc>http://project.app:8000/sitemap.xml/categories</loc>
    </sitemap>
    <sitemap>
        <loc>http://project.app:8000/sitemap.xml/questions</loc>
    </sitemap>
    <sitemap>
        <loc>http://project.app:8000/sitemap.xml/tags</loc>
    </sitemap>

</sitemapindex>
Creating the dynamic url's for the sitemap
Head over to SitemapController class and create more methods for each of the Database Tables that we want to generate url's to include in the sitemap. Here I have created methods for articles, categories, questions and tags.
   public function articles()
    {
        $articles = Article::latest()->get();
        return response()->view('sitemap.articles', [
            'articles' => $articles,
        ])->header('Content-Type', 'text/xml');
    }

    public function categories()
    {
        $categories = Category::all();
        return response()->view('sitemap.categories', [
            'categories' => $categories,
        ])->header('Content-Type', 'text/xml');
    }

    public function questions()
    {
        $questions = Question::latest()->get();
        return response()->view('sitemap.questions', [
            'questions' => $questions,
        ])->header('Content-Type', 'text/xml');
    }

    public function tags()
    {
        $tags = Tag::all();
        return response()->view('sitemap.tags', [
            'tags' => $tags,
        ])->header('Content-Type', 'text/xml');
    }
Now that we have done pretty good job with controllers, lets head over to resources/views/sitemap and create views for each articles, categories, questions and tags.
Below is how my articles.blade.php looks like. I have put my changfreq as weekly which can be changed to daily, monthly or yearlytoo. You can also set the priority which ranges from 0.1 to 1.0. you can read more about it in sitemaps protocal page.
Please be aware that setting the priority or change frequency high or low is done from your side only. It is upto search engine robots to do the honour.
<?php echo '<?xml version="1.0" encoding="UTF-8"?>'; ?>
<urlset xmlns="http://www.sitemaps.org/schemas/sitemap/0.9">
    @foreach ($articles as $article)
        <url>
            <loc>http://project.app:8000/articles/{{ $article->slug }}</loc>
            <lastmod>{{ $article->created_at->tz('UTC')->toAtomString() }}</lastmod>
            <changefreq>weekly</changefreq>
            <priority>0.9</priority>
        </url>
    @endforeach
</urlset>
Now repeat the same process for categories, questions and tags.
Please keep in mind that
<lastmod>,<changefreq>and<priority>tags are optional. So feel free to avoid them if you like.
Creating routes for the sitemap
Open up your routes.php file and add the new routes for sitemaps.
Route::get('/sitemap.xml', 'SitemapController@index');
Route::get('/sitemap.xml/articles', 'SitemapController@articles');
Route::get('/sitemap.xml/categories', 'SitemapController@categories');
Route::get('/sitemap.xml/questions', 'SitemapController@questions');
Route::get('/sitemap.xml/tags', 'SitemapController@tags');
Quick note: If you encounter any error loading your page view, make sure to place these sitemaps routes to the very end of all your routes list at
routes.phpor vice versa. Sometimes they conflict with each other.
Now we have controllers and views ready for dynamic sitemap. The reason it is dynamic is because everytime you create a new article, categories, questions or tags. We don't need to add any url's to sitemap manuallly, It will be automatically included in sitemap because we are using controllers to do this excellent job.
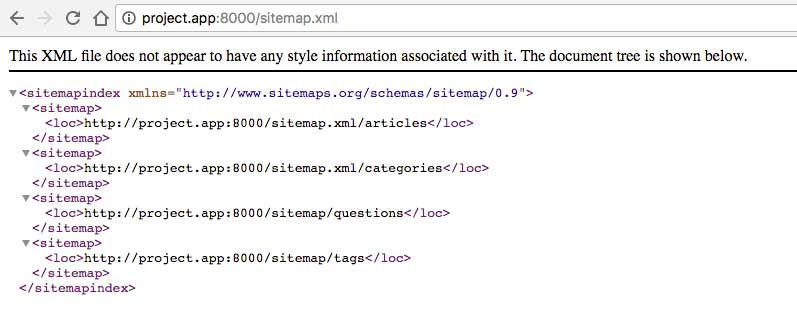
Now I can go to http://project.app:8000/sitemap.xml to see the list of sitemaps that I created. If you go to your website.com/sitemap.xml, You should also see the list of sitemaps you created like the screenshot below.
Sitemap index screenshot
You need to submit only one url website.com/sitemap.xml to google. You can also go to individual sitemaps and see for yourself the list of articles links that is generated dynamically.
Articles sitemap screenshot

Conclusion
In this article, We learned how to use controllers, views and routes and do things the way we usually do in laravel to create a dynamic xml sitemap. The best part of it is that we have created individual sitemaps for each of our database tables and inform search engines about our url's that will synchronize dynamically.
All this without using any third party packages. This is great! I hope this article was helpful for you. Leave your comments below for further discussion.